Create a Managed Service Campaign
How-to | Last updated: 4/16/2026 | Learn how create a Managed Service Campaign
Leveraging Kroger Precision Marketing (KPM Kroger Precision Marketing)’s expertise, data, and technology, Managed Service Campaign are created and implemented with the help of an Account Management team.
Managed Service Campaigns benefit from an integrated KPM ecosystem connecting digital and in-store touchpoints. This integration allows for omni-channel Campaign execution and measurement.
There are several parts to this creation process. While there is no specific order in which these parts need to be completed, you'll need to begin with Select Managed Service Campaign.
Select Managed Service Campaign
-
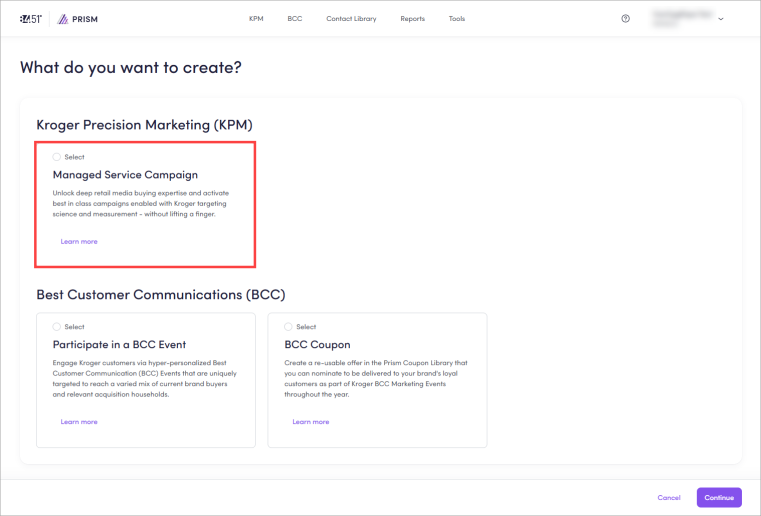
From the KPM dashboard, click Create.
-
Select the Managed Service Campaign card.
-
Click Continue.
Create Campaign
-
Enter or use the dropdown to select your Client Name.
-
Enter the Brand Name for your campaign.
-
Enter a descriptive Campaign Name (200 character limit).
84.51° recommends following this naming convention to help you identify your Campaign:
-
Start with XCM Cross-channel measurement / CXCM for a Cross-Channel Campaign or Fresh MSC.
-
End with the Manufacturer, Brand, date, and a unique Identifier / initiative.
For example, XCM_Display Ad_SFPRJ123_Kroger_SimpleTruth_MMYY_Awareness
For Custom Influencer Campaigns on Meta, use the same naming convention for both Campaigns.
For example, XCM_Meta_Influencer_SFPRJ123_Kroger_MMYY
-
-
If prompted, select Yes or No to answer, "Is an agency involved in this Campaign?".
If Yes, you'll need to perform additional actions:
-
Select Yes or No to answer, "Is an agency billed for this Campaign?".
-
Enter or use the dropdown to select the Agency to be billed for this Campaign.
-
Select Yes or No to answer, "Will the agency issue an IO for the campaign?".
-
-
Enter any Background Information about your brand and products.
This additional information helps 84.51° Prism understand your Campaign objective and why you are running your Campaign.
-
Select which channel(s) you want to include with your Campaign.
You can select more than one (1) channel to create a Cross-Channel Campaign.
To learn how, see Create a Cross-Channel Campaign.
Each channel has specific Campaign Details that need to be entered to complete intake.
To learn more, see Add Campaign Details.
-
If prompted, select Yes or No to answer, "Will the creative for any of the following channels be overlaid with Kroger co-branding?".
-
Click Continue.
If your account only has one (1) client, then this information is auto-populated for you.
This action creates your Campaign and its associated dashboard which is now available to you and anyone else who has access to the same client and agency.
At this point, you don't need to complete the parts in any specific order, but all parts must be completed before you can submit your Campaign.
Add Campaign Details
-
On the Campaign Details tab, click Start.
-
Follow the full instructions for each channel to finish adding Campaign Details.
-
Create a Targeted Digital Coupon
While intake for Targeted Digital Coupon is done via Managed Service, they are classified as Incentives.
To learn more about them, see Targeted Digital Coupon.
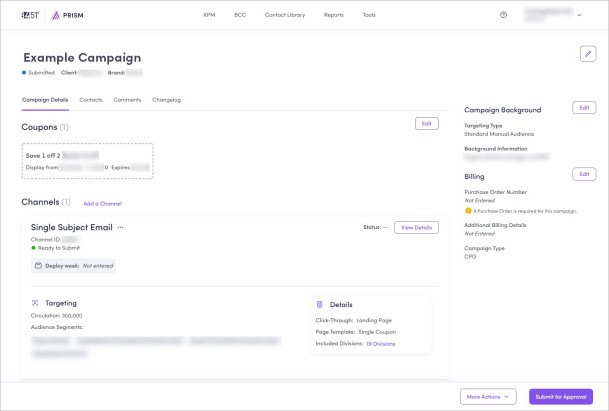
From the Campaign Details tab, you can also track the status of your Campaign, any targeting requests / status of those requests, and view measurement information.
Targeting status
If you're using any kind of targeting with your campaign, the status of your request is displayed in Campaign Details.
-
Campaign Details Required — 84.51° Prism does not have complete campaign information for this audience request.
-
Ready for Targeting — Your channel is ready to run a targeting request.
-
Audience Sizing in Progress — Check back later to see if your audience is ready. If you entered an email address, you will be notified there when the audience is ready.
-
Audience Results Are Ready to Review — Click into your channel to view more audience information.
-
Audience Failure — A failure could be caused by a technical error, or due to not meeting the minimum number of households for a given channel. Click into the channel to see more details on what caused a failure.
Modify Contacts
On the Campaign dashboard, click Contacts to modify (assign, edit, and remove) contacts as needed.
Assign a contact
-
Click the ellipsis (
 ) on the contact card (for example, Primary Contact) you want to add.
 -
Click Edit.
-
Scroll to find the person you want to assign from the list of existing contacts.
If you can't find the person, you can create a new contact.
-
Repeat for each required contact.
Edit a contact
-
Click the ellipsis (
) on the contact card you want to edit. -
Click Edit.
-
Scroll to find the contact that needs to be updated from the list.
-
Click the edit icon (
 ).
). -
Update the required contact information.
-
Click Save.
Add a new role
-
Click Add Role.
-
Select the role you want to add from the dropdown menu (for example, Secondary Contact).
-
Select the person you want to add from the list of existing contacts.
If you can't find the person, you can create a new contact.
Remove a role
-
Click the ellipsis (
) on the contact card, then Remove Role. -
Click Remove Role.
Add Comments
-
On the Campaign dashboard, click Comments.
-
Click Edit.
-
Enter any additional Notes About This Campaign into the open text box.
-
Click Save.
Submit Campaign
-
From the Campaigns Dashboard, find and select the Campaign you want to submit for approval.
-
Review key information like Campaign Details and Contacts to make sure everything is correct and complete.
If you want to add more channels, do so before submitting the Campaign for approval.
To learn how, see Create a Cross-Channel Campaign.
-
Click Submit for Approval.
This action sends your Campaign to 84.51° for review.
If you haven’t signed 84.51° Prism Terms and Conditions, you'll be prompted to sign them before submitting your Campaign.
Once your Campaign is approved / finalized and the project brief is signed, your Account Manager will contact you about:
-
Creative timelines
-
Asks during and after a Campaign
Create a Cross-Channel Campaign
Cross-Channel Campaigns are any combination of the measurable tactics (with a maximum of one (1) of each channel).
Brand Shop and Meta Ads cannot be included with other channels for a Cross-Channel Campaign.
As such, for a Custom Influencer Campaign, if you select Meta as the platform, you'll need to complete one (1) intake for Custom Influencer and another intake for Meta (as a single channel).
If you choose Display Ad, Pinterest, or Snapchat, you'll create a Cross-Channel Campaign.
-
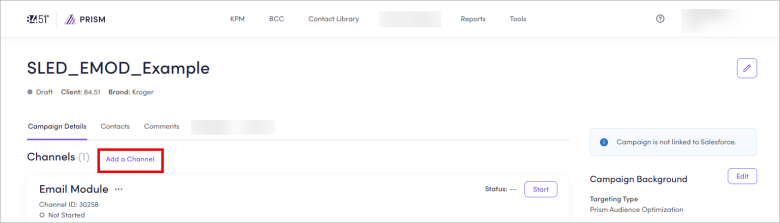
On the Campaign Details tab, click Add a Channel.
-
Select which channel(s) you want to add to your Campaign.
You can select more than one (1) channel to create a Cross-Channel Campaign.
-
Click Add Channels.
-
Follow the full instructions for each channel to finish adding Campaign Details.
Link to Salesforce
For all channels except for Racing / Gaming Campaigns, you'll need to link to Salesforce.
|
With the Salesforce ID Identification |
Without the Salesforce ID |
|---|---|
If you receive an error, check to make sure you've entered all the required information (like EMOD Email Module cost). If you still have issues, contact iService. |
|
View performance
KPM’s unique data science uses a rest-of-market multiplier to assess how your Campaign affected the total market, including Kroger and other retailers.
Once the attribution window has ended (approximately two (2) weeks) for your Campaign, you may want to view it's performance in the Report Center.
Specifically, you may want to look a specific metrics, including, but not limited to:
-
aROAS Attributable Return on Ad Spend — Helps to gauge the return you received for your ad spend. It doesn't factor in whether the ad truly affected customer behavior. You could also use it as a comparison to Sales Uplift.
-
iROAS Incremental Return on Ad Spend — Helps to gauge the incremental return you received for your ad spend. This metric only factors the sales that were determined to be incremental based on customers seeing the ad.
-
Redemption Cost — Helps to understand total dollars spent on coupon redemption for a Campaign, which gets factored into the ROI Return on Investment.
-
Total Units — Helps you see what types of units (multi-pack, single, etc.) a customer is purchasing. For example, if Sales Uplift was High but Total Units was Low, then customers are probably buying more expensive units.
-
Total Visits — Helps you see if households are making multiple trips or buying in bulk (multiples per basket).
To learn how, see View Incentives Campaign performance.
Cross-Channel Campaign report
If you're running a Cross-Channel Campaign, you may qualify for PrecisionView 360 measurement.
To learn more, see Cross-Channel Campaign reporting.
Related topics
Want to learn more about this topic? See these related topics:
Learn more
Explore other sections in the Learning Center to learn more about 84.51° Prism: